Sunday, November 25, 2012

Buttons to Jewelry DIY Tutorial, Part 1

After meeting Ping the other week, I got to explore a 4-story fabric store in the city and found these gorgeous buttons.  I was originally planning on turning it into a pin, but decided on making a necklace instead.  I should also note that though these buttons were expensive, I'm guessing they are just very cute replica buttons.  The store didn't specify one way or the other and none of the buttons there are labeled with the designer.


What I Used:
  • Button
  • Pearls
  • Stringing material
  • Ribbon
  • Jump rings large enough to fit the ribbon
  • Crimp beads 

Materials

1.  Plan out your design by laying it out
I love this little design board - so handy!  I think mine was only $1.50 and you should be able to find it at any jewelry supply or craft store.

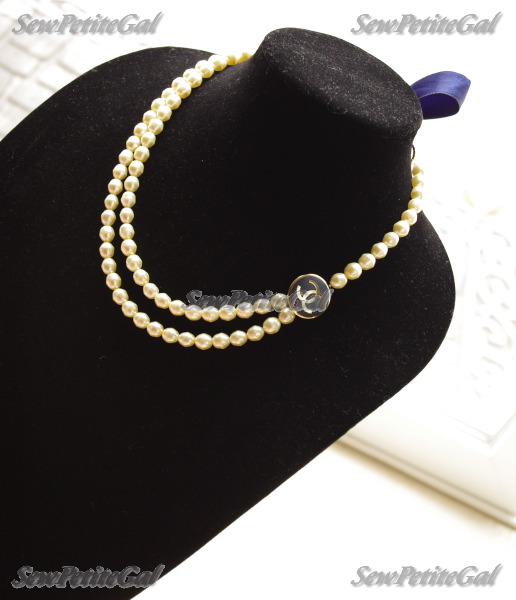
After playing around with it, I decided to forgo the all-around double pearl strand for an asymmetrical look.  Does this look off (below)?

2.  String it as planned above and loop your stringing material onto a jump ring.  Secure with a crimp bead.  Do this for each side.

3.  Knot a ribbon to each jump ring.  Add a small dollop of glue to ensure your knot doesn't unravel.

4.  I trimmed my ribbon ends at an angle and then sealed the ends with Fray Check.  Clear nail polish will also work.

5.  You're finished!  I love ribbons closures because they allow you to customize the length as you please.

Long option for wearing

Shorter option

Stay tuned for part 2 next week and a Black Friday recap later this week :)

Hope everyone in the US had a wonderful holiday weekend!  I ate SO much.  What did you eat - traditional turkey or something else?

We went out for pho & banh mi for lunch and then stayed home for hot pot.  Yum!

Wednesday, November 21, 2012

Blogiversary, Being Thankful & Beyond

I fell into blogging a little haphazardly.  I had been following DIY and petite blogs with great interest and decided to start one of my own with a primary focus on sewing.  I wanted to name it SewInspired - chronicling my DIY inspirations and the way I went about making my own version.  My plans changed when I found out that name was already taken.  I decided to broaden my blog a little bit to incorporate the fitting room reviews I loved reading and thus SewPetiteGal was born.  (And in case anyone was curious, I didn't intend for "SewPetiteGal" to indicate I am "so petite."  I was aiming more for sewing + being short.  My husband bluntly pointed out that I'm not so little and obviously much larger than most of the petite blogging community.  My fault for the ill-conceived name!

Anyhoo, fast forward a little over 2 years and here we are.  Thank you so much for taking the time out of your day to come visit my little blog.  Thanks x 100 to those who comment because I really do love hearing from you.  Your advice, pointers, and constructive criticism have helped me grow as a DIY'er.  I wanted to take a little time here to show some love to some special folks:
  • Jean - For being one of my first followers and welcoming me to the blogging community with kindness and advice.  And more recently, for offering to critique my prototype peplum skirt, giving me invaluable feedback, featuring it on her blog and making me feel like I could play "fashion designer" with my little Etsy store :)
  • Cee - for being my preppy / layering inspiration and wearing my scarf so well that a reader requested one in the middle of summer!
  • Aubrey - for sharing my love of all things nautical, answering all of my tedious Twitter requests for DIY input, and keeping me LOLing with your humor.  
  • Gigi - your blog is ridiculously awesome at keeping me up to date on one of my favorite subjects - shopping
And finally, this blog focuses on 2 of my hobbies: DIYs and shopping.  I'm thinking of pulling in a 3rd hobby, and quite possibly, my favorite one: food.  I started a little food blog on the side and am now pondering integrating it here or keeping it separate.  What do you think?

I'm ending this post with a picture of my precious little girl with a giant cup of bubble tea (Tiger Milk Tea specifically), because every post should have a picture of some sort :)

Happy Thanksgiving!!!

Sunday, November 11, 2012

LOFT Inspired Bow & Rhinestone Sweater DIY Tutorial

I originally tried this on a few weeks ago and have still been thinking about it.  A clue to either buy it or DIY it.  I chose the cheaper route ;)

Inspiration and DIY'ed Version
LOFT Striped Bow Necklace 3/4 Sleeve Sweater (link)
I know I made the bow a little too big, but I'm hoping to also use this as a neck tie like this:

Asos top

Want to make one too?  See the full tutorial after the jump.

Wednesday, November 7, 2012

Black Tie DIY Part 2

On Sunday, I asked which of the 3 options here would be most appropriate for a black tie event and most were in favor of the plain with gathered shoulder.  I wound up making all 3 (more explanation below), but wore the gathered ruffle to the event.  (Sorry for more iPhone pics, I still can't find that darn camera remote.)

Full-length and up-close (w/ a shot of my attempted updo)

As Jessy correctly surmised, I made the ruffle detachable with options to wear as full length or gathered.  The detachable ruffle transforms to a gathered ruffle with a few well-placed snap buttons.  I always love when I see garments with multiple ways of wearing and I'm trying to adopt that into more of my DIYs.

One dress, 3 options to wear

Want to help plot future transformable garments?  I'd love to hear your ideas!

Sunday, November 4, 2012

Black Tie DIY Part 1 & New Sewing Room

Weeks ago, my husband told me we'd be going to a black-tie event the first weekend of November in SF.  At the time, I thought, "Eh, I can whip up a dress AND get everything unpacked."  I underestimated how much stuff we have, or more precisely, overestimated my organizational capabilities.  So I put everything on hold and set to work.  I knew I wanted to make a long gown in a fabric that I already had (to speed up the process) with some kind of interesting detail.  I decided on a one-shoulder top and pondered my options:

L to R: Plain w/ Gathered Shoulder, Ruffled, Gathered Ruffle

I did ultimately make a decision (will be posted later this week), but I'm curious on what you think.  Which option (or perhaps none of the above) would you choose for a black tie event?

And a peek into where all the pondering and sewing happens:

I have most of my fabrics folded up neatly and organized - 3 more boxes (eek) to go!

My sewing station: Janome Serger and Singer Heavy Duty 4423

I decided to merge our office and sewing area together.  In Ohio, my sewing area was the dinette in our kitchen which made set-up and take-down a pain in the butt.  I'm much happier with this new arrangement!

LinkWithin

Related Posts Plugin for WordPress, Blogger...