Sunday, June 21, 2015

Scarves to Maxi Dress DIY Tutorial

I know I spend an insane amount of time making maxi dresses, but I can't seem to help myself.  This one is very simple - you're essentially sewing the sides of 3 scarves (or 3 fabric squares together) and adding straps.  See below for steps!

3-Scarf Maxi Dress DIY

Difficulty: Very Easy

Time: ~1 hour

Pattern:  None - use 3 squares

Materials:
  • 3 square scarves OR cut 3 squares out of lightweight fabric - I'd recommend something silky
    • For maxi length - I'd recommend 34.5" squares so that the diagonal running from shoulder to hem is 48" (keep in mind to adjust if you're taller!)
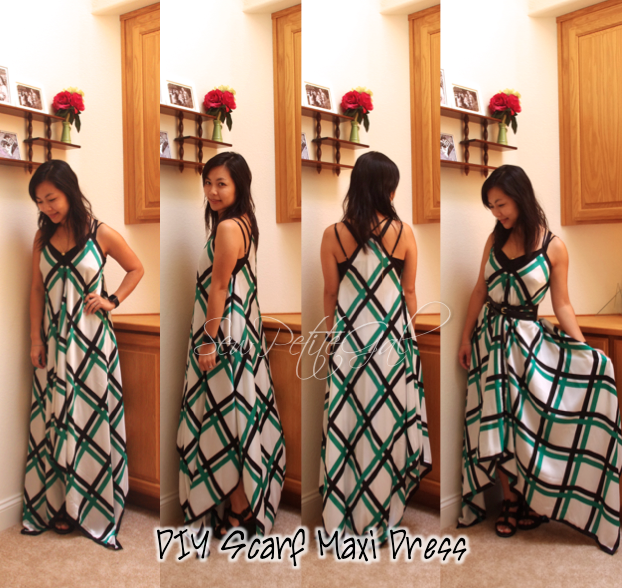
    • Because I used grid fabric, I had to follow the pattern for my squares and wound up with 37.5" squares - hence the floor sweeping length
  • Strap material - I used black bias tape, but you can use fabric, leather, etc.  Braided straps would be SO cute
Steps:
1.)  You're going to need a person or dress form for this, but position 1 scarf point at each shoulder and pin where these meet for the placement of your neckline


2.)  Place 1 point of your 3rd scarf at the center back right at the base of the neck


 3.) Pin under the arms where the front meets the back

4.) Play with strap placement and mark with chalk (I didn't actually go with the one shown below, but it was fun to experiment)

5.)  Sew down the center front from your pinned neckline all the way down the edge.

6.)  Sew down each side from the underarm pin all the way down the edge.

7.)  Pin your strap placements and carefully try on your dress.  Make sure straps fit comfortably and make length adjustments as needed.  Sew straps in place.

And you're finished!

Questions?  Please feel free to leave me a comment below or send me an email!  :)
Finished Scarf Maxi Dress

Sunday, June 14, 2015

Striped Racerback Maxi Dress DIY

We're seeing warmer weather in the Bay Area and it's time to start sewing some maxi dresses again.  Comfortable and cool, this is my uniform for the summer and I especially love knit versions for both ease in sewing and in wearing.

Material:  Stretchy knit from Michael Levine, 2 yards

Difficulty: Easy, all serger construction (you can also use a twin needle on a regular machine)

Time: ~3 hours

Pattern: Patterned bodice based off of this previous Racerback Maxi Dress DIY minus the gathering at the bust, self-drafted skirt (just a rectangle)

Striped Racerback Maxi Dress DIY

And in case you ever wondered who was catching my attention...
:)

Hope everyone had a great weekend!

Wednesday, June 10, 2015

10 Minute Lariat Necklace DIY Tutorial

Wednesday is mini DIY day!  Ok, not really, but here's a quick and easy necklace to whip up:

Nautical Lariat Necklace DIY
(Eep, apologies for the dusty necklace display)

Difficulty: Very Easy

Time: ~10 minutes

Materials: ~$3 in materials
  • Necklace Chain in your preferred lariat length - mine was about 24"
  • Pendant Charm - anything you'd like as the centerpiece - I chose an anchor 
  • Circular Charm - I found a little ring charm in my jewelry supplies
  • Coordinating jump rings
  • Jewelry pliers and wire cutters - you can get a kit at your local craft store for under $10 (Joann's and Michaels always have some kind of 40% coupon!)

Steps:
1.)  Measure out the length of your lariat and snip with your cutters.  It's helpful to drape it around your neck to see how long you'd like it to fall.

2.)  Attach a jump ring to the end of the chain and add your ring charm to the same jump ring

3.)  Thread the other side of your chain through your ring charm.  Alternatively, if your pendant charm fits through your ring charm, please feel free to skip this step.

4.)  Similar to Step 2, add a jump ring to the end of threaded chain and attach your pendant charm

Simple and inexpensive!

Interested in more jewelry and accessory DIY tutorials?  Check out my Pinterest board for links to other projects!  :)

Monday, June 1, 2015

Easy 30-Minute DIY: Slouchy Tee or Sweater

I LOVE that I'm seeing more slouchy, comfortable clothes popping up in stores.  They work perfectly for weekends with the kids, and now that I've gone from conservative corporate to a more casual workplace, slouchy works there too :)

This one is a very easy and quick DIY.  The best part?  You get a short-sleeved look without actually having to attach sleeves into an armscye (not my favorite task).

Difficulty: Very Easy

Time: ~1/2 hour

Pattern:  Make your own from an existing tee

Materials:
  • Existing blouse to pattern your top - drop shoulder is easiest 
    • BUT you can also use a regular tee and just extend your cut from the shoulder to the arm as one continuous line instead of cutting out separate sleeves.  From neckline to end of sleeve should be about 7-8".  Make sure you keep the torso pretty close to the end of the sleeve (see pic below under step 1) if you want the slouchy feel.
  • ~3/4 yard fabric - sweater knit or any other stretchy knit
Steps:
1.)  Fold your shirt in half and align that fold with the fold in your fabric.  Use your shirt as a template to cut out the front piece and back piece (more details below).

Align shirt fold to fabric fold

2.)  The back piece can be cut exactly as laid out above.

3.)  For the front piece, simply push the back collar inwards so you can get clear access to cut the neckline of the front (shown directly below).  Cut the front piece as you did the back after you've made the neckline adjustment.

Tuck the back neckline inwards

4.)  You should now have 2 pieces as shown below.   

Back piece on Left and Front on Right

5.)  With the front and back cut out, place the right sides together and pin at the shoulders.  Sew each shoulder and each side.  

6.)  Fold in your raw edges at the sleeves, collar, & hem and sew down.

(Apologies for a not so great pic)

And that's it!  Call it a slouchy tee or a summer sweater if you used a sweater knit like I did (perfect for breezy SF summers).

Questions?  Please feel free to ask in the comments below or send me an email :)

Sunday, May 24, 2015

Hello and a Mini DIY

Hello!  It's been a long while since I've last posted (some ramblings on why below), but let's start with a quick and easy mini DIY.

I have a number of bib-type necklaces that rest on the collar.  If I wear a collared shirt or turtleneck (it's been in the 50s-60s here lately), I feel choked when wearing a necklace.  So though this may be a DUH to many of you, I wanted to share how to quickly extend a necklace if you're like me.
Necklace Extender - just add a bracelet!  
This gives you the adjustable length you need and a bonus of a cute dangler to hang down your back.  Particularly useful when you were thisclose to leaving for work when realizing your necklace was too short.

And then some rambling - please feel free to skip :)

So where have I been?  It all started with a trip to Hong Kong during Thanksgiving last year.  It was both a very good trip and a very horrible one.

The good:
  • FOOD!
  • Fabric shopping
  • Seeing Jay Chou in concert
The bad:
  • 4 out of the 5 of us got sick.  Our 5 year-old had his first febrile seizure and went to the emergency room.  Thank goodness we still have family in HK to help us navigate through the healthcare system.  Poor guy had to spend the night for monitoring, but thankfully was ok to come home to the hotel (and back to the US a couple of days later).
  • Broke my toe on Day 3 of our 12 day trip and limped around for the remainder.  And to be a little whiny (a lot whiny?), we walked 5-8 miles per day anyway.  
Once we came home, I spent quite a bit of time being inactive while waiting to heal.  Inactivity plus good food equaled 7 lbs in rapid weight gain. The extra weight on someone of my stature was...ahem...noticeable, to say the least.  Sewing was the last thing on my mind - I didn't want to sew larger items only to alter them later so I threw my focus into getting back to my normal weight.  I first started watching what I ate on weekdays while indulging on the weekends (a compromise I knew I could realistically stick to) and as I healed, I started getting active again.  It took FOUR months to lose the weight I gained in ONE.  But I'm now back to normal and hope to start sewing again!

While I get back in the swing of things, you can always find me on Instagram under the name, "SewEatRepeat."  I'm still toying with the idea of changing the blog name to reflect this as well, but I'm also kind of lazy, so we'll see :)


LinkWithin

Related Posts Plugin for WordPress, Blogger...